This maybe a daunting task and spoken way too many times for you to read, but it is always too important to revisit the basics. This includes installing linux for your server. There are many OS based on linux, but one I recommend for the beginners is Ubuntu (Enterprise Open Source and Linux | Ubuntu). It is heavier than other linux based OS, but I still think it is the easiest one with tons of resources and troubleshoot.
Requirements
- At least 2GB of free storage space
- A DVD or USB flash drive containing the Ubuntu Server installation
Installation Steps
- Boot from the install media (DVD or USB flash drive).
- Choose the language and keyboard layout.
- Select the installation type (e.g., normal or minimal).
- Configure networking and storage.
- Confirm partitions and storage settings.
- Set up a profile with your name, username, and password.
- Install the software.
- Complete the installation and reboot the system.
Boot from the install media
For installation media you will need to download ISO file from Ubuntu homepage. I would recommend getting Ubuntu server as rest of the guide will use Command Line Interface (CLI) to guide you through setup. This guide will use 22.04.3 LTS as it will be supported till April of 2032. Once ISO file is downloaded you will need a thumb drive to create booting drive.
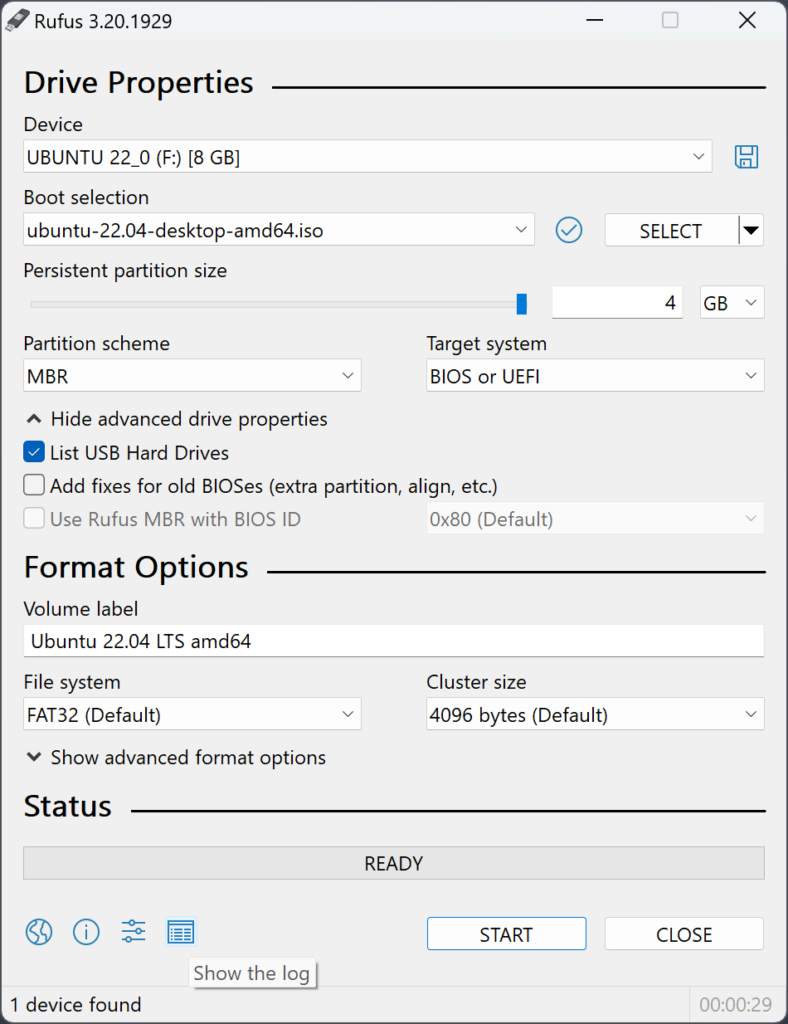
To make your thumb drive a bootable disk you will need Rufus (Rufus – Create bootable USB drives the easy way). Select your thumb drive with drop down menu on device. Select ISO you downloaded from the Boot selection. Leave EVERTHING else as it is and click START.

You will need to boot from bootable disk you just created. This requires inspecting your motherboard UEFI manual. It might be as easy as pressing F8 on some motherboard to accessing BIOS to change boot sequence. Since there are way too many boards to get into detail, the best option is to search “How to change boot sequence on ‘motherboard manufacture and model'” will give you best possible solution.
Choose the language and keyboard layout
As we are a global community you might be tempted to use your first language. While that will not be a problem, I would like to note most of the troubleshooting guides and tutorials are available English which make it better in most case to use English as your choice of language and Keyboard layout.
Choosing a type of install
I find it best to install regular ubuntu server instead of the minimized version due to things that are available with SSH connections.
Configure networking and storage
If you are connected to network with DHCP (if you automatically get IP address you might already have DHCP), all you have to do is to mark down the IP address that is assigned and click done.
22.04 LTS unfortunately made storage setting a bit difficult. In our case we want to use a full disk, but even with use an entire disk it will only partially use it. To avoid this issue and maximize LVM function follow this steps exactly.

Use default setting of Use an entire disk and set up this disk as an LVM group. This will allow you to easily expand storage if you need to (especially important for VM).

Once you click next this is the setup page. This is one of the changes from 20.04 to 22.04. You will find free space. You can select the highlighted selection and press enter to edit.

On this screen edit Size to max value. This will allow you to use maximum storage for your root volume. Unlike other method to setup storage without LVM this will allow users to gain full benefit using LVM and use maximum storage.
Set up a profile with your name, username, and password

If you are greeted with this screen, you are almost there. Fill out your profile to secure your installation!
Install the software
After setting up your profile, you will have options to install default application. It is my recommendation that you setup SSH.

DO NOT install anything else as other installation is supported with Snaps that can conflict with our server setup later.
Complete the installation and reboot the system
Your system will be busy installing new Ubuntu to your system. Once it is done click enter and reboot your system. Also don’t forget to remove the bootable drive!
This is it! Your first ever Ubuntu installation. I will cover various CLI prompt to quick start your Linux experience, but until then here is little something for you to have fun! Introduction to Basic Troubleshooting Terminal Commands in Ubuntu Linux | Dell US
For further assistance and information, visit the Ubuntu Server installation tutorial.
